This Section Below Is For Troubleshooting Air Conditioner Electrical Problems

Click Here For Download of The Fedders A6Y18F7A-A Manual (892K PDF).

Usually a/c problems are electrical problems.

The most common type of electrical problem is the wires themselves. Where ever there is a connection to a wire there is a potential problem.

By connection I mean the factory crimped on connectors that attach to all the components. Over time the spot where the wire and the connector meet look for corrosion, heat damage, rust, ect.

The next most common electrical problem is the switches such as the main contactor (relay), fan relay, ect. They can stop working when the internal switches burn and pit. You need to use an electrical tester to check these.

To start off with you must check to see if the power is on at the outlet where the cord plugs in (window units) or if its a central air conditioner you must check inside the box (the circuit breaker on the side where the power cord comes out of the unit), the breaker box has a removable cover around the breaker.you must use an electric tester to make sure that the voltage is correct. Or if their is no meter use some kind of tester that emits a light.

Below there is information for window units, below that; central units.

All window units and central air conditioners have a switch of some type that the main power cord goes directly to after it enters the casing of the unit. On a window unit the power runs through a wire that is plugged into the wall outlet then passes through the metal cover. Inside the cover the cord is split, the ground wire (either green or a bare wire is screwed to the metal covering of the a/c).

You will need to remove the casing of the a/c to get to the internal wiring.

MAKE SURE THAT THE POWER IS CUT OFF OR THE UNIT IS UNPLUGGED, THEN CHECK AGAIN !! You can never be to safe.

The other 2 wires are split up (we will call them #1 black, #2 white). #1 black wire goes to the selector switch on a window unit, this is the switch that has (off, high cool, low cool, high fan, low fan). From the selector switch things get buisy, looking at the back of the selector switch you will see many wires hooked to it, this is where the #1 black wire coming into the selector gets sent to the vital parts, compressor, fan motor.

The #2 white wire goes directly to each of the components (fan motor, compressor). Again on a window unit one of the wires, in our case the white wire comes in from the plug to inside of the unit after entering the unit the white #2 wire is connected to the wire connector on the back of the selector switch. The wires all are common to each other because they are the same leg (leg= each wire #1 and #2 are called #1 leg #2 leg)****SEE THE IMAGE BELOW****


Since the #2 white wire is allways connected to the fan and compressor, since it doesn't go through a switch. BUT in some cases as stated above, All that needs to happen to get the a/c to work is to get the #1 black wire to send power through the switch to the compressor and fan.

The selector switch is the way the power from #1 black wire gets to the fan and compressor. So when you turn the switch to cool the power that came in from the cord that connected to the selector (#1 black wire) goes through the switch to the fan (now the fan has both wires with power so the fan comes on).

BUT!!! The selector switch also sends the #1 black wire through the switch to the compressor, heres the BUT! But after going through the switch the wire connects to the thermostat (the thermostat acts like an on off switch depending what temperature you set it at)THE COLORS REPRESENTED ON MY IMAGES ARE FOR UNDERSTANDING THE BASIC WIRING OF THE GROUND, NEUTRAL, AND HOT WIRES ON on actual a/c's the wires are different colors.


Central Air Conditioners.

On central units the thermostat on the wall sends 24 volts (24 volts comes from a transformer in the blower housing) to relays and contactors that switch the power on and off to the compressor and motors.

The relay and contactors are like any other electric device, it needs both wires to work. Inside the blower unit (the unit that is inside the house on split systems) the transformer reduces the voltage from 220 down to 24 volts. The transformer has 2 wires coming out with 24 v. one of those wires goes to every relay (switch). The other wire (red) goes to the thermostat, then the thermostat sends the power to the relays (switches), as the temperature goes up and down the thermostat turns on and off the relays that power the compressor and fans.

The reason its only 24 volts is so if you touch a live thermostat wire you will not get electricuted.


Below is diagram of the 24 volt system


Below is a diagram of a central a/c commonly wired Below that is a window unit commonly wired


Air Conditioning Parts And Repairs


This page contains some Air Conditioning problems and parts that I use to repair the problems. I see these problems most often every summer in our 16 year HVAC business. Let us help you repair your air conditioner and save money! 

*Summer Air Conditioning Tip: Always turn your air conditioning system off if there is a threat of a storm. A lightning power surge, or if the power is goes off and on can ruin your air conditioning system. We get lots of repair calls after a storm. These calls could be prevented if people could remember to turn their air conditioners off during a storm.

Below are listed the parts that I see go out most often. We even have one device that will help try to start your compressor if it is locked up called "Super Boost!"

Customer Shipping time and Customer Satisfaction are our Top Priorities! Same Business Day Shipping On All Orders Received Before 1 PM Eastern Standard Time! We ship UPS & USPS.  Please see our shipping time page if you would like more information about our shipping.

*We ship to the 50 United States & Canada.


Listed below are many of the air conditioning problems that I see on a daily basis with my HVAC company her in Louisville, Kentucky. I wanted to list some of the problems and give you a chance to purchase the parts, and repair your air conditioner yourself. 

Please see the section near the bottom of this page, "What to Check for If Your Air Conditioning System is not Working." I try to give step-by-step procedures on how to troubleshoot your air conditioning system.

Please always, make sure all electrical power is turned off before attempting to do any heating or air conditioning repairs. Please read our disclaimer and "Safety First" related information near the bottom of this page. Thank You!

Problem #1: Outdoor condensing fan motor has stopped running. This problem could be caused by a bad motor run capacitor. Please see our Run Capacitor Page to purchase a new capacitor. Here is a link to our capacitor page: . If your motor capacitor is not the problem, then more than likely you need a new motor. We do not sell condenser fan motors. Is the fan blade tight, stiff or hard to turn? If the fan blade is hard to turn then you probably need a new motor.

Problem #2: Air conditioner compressor will not start. When power is applied to the air conditioning outdoor unit the fan starts, but you hear a sound like the compressor is trying to start, "UGGG"..., for about 5 to 10 seconds and then all you hear is the outdoor condenser fan run. The compressor is locked and will not start. What is happening is the compressor is trying to start, but because the compressor motor is locked it tries to start for a few seconds and then because of the high amperage being drawn goes off on internal overload. The internal overload protects the compressor windings from overheating and burning up. I see this many times during the start of the air conditioning season. Some compressors just have a hard time starting after sitting all winter long. Some compressors are locked up so bad that I can not start them and must tell my customer that they need a new compressor or new air conditioning system. Many times I can get the compressor started again without having to buy a new compressor or new air conditioning system by using the device that I sell below. It is called, "Super-Boost." I keep two or three of these on the truck. They have saved many of my customers from having to buy new air conditioning systems. Below is a description of the "Super Boost" with an opportunity for you to purchase.

The Super-Boost could save you from having to purchase a new air conditioning compressor or system!

The Supco, Super-Boost has the following features that make it a life saver when it comes to air conditioning repair:

  • The Supco can save stuck compressor by increasing the compressor's starting torque by 500%.

  • The Supco, Super-Boost is a solid state relay and hard start capacitor no loose parts or complicated wiring. Just wire it across your run capacitor as shown below.


On dual capacitor systems just connect between the "C" and "Herm" terminals. Please see picture below:


More Features:

  • The Super-Boost can be used on all PSC single phase 115 volt thru 288 volt air conditioning units from 4,000 to 120,000 BTU.

  • It can be used on a wide range of air conditioning compressors from 4,000 BTU window units to 10 ton commercial units. 

  • The Supco Super Boost is used for tight or locked compressors, if you have low voltage, or for quick recycling of the compressor. 


Supco SPP6 Super Compressor Boost Hard Start Capacitor

  Price $20.00


Problem #3: This problem is probably the second most common problem that I see every summer. The problem is a bad compressor or fan run capacitor. The Air conditioner outdoor unit will not come on. Either the outdoor fan does not run, the compressor does not run, or both the fan and the compressor do not run. You checked and reset your breaker and the outdoor unit still does not come on. You can hear a little humming sound, sometimes a "Uggg" inside the unit when power is applied. The "Uggg" is the compressor trying to start. You might hear the low voltage contactor humming. You pull the disconnect and disconnect the power to your outdoor air conditioning unit. Please make sure your electrical power is off before working on any air conditioning equipment. You take the door or cover off your outdoor unit's control box and find a bad, swollen run capacitor. EPA stopped allowing manufacturers to produce capacitors with cancer causing PCB's. Since they stopped allowing the use of PCB's the capacitors now have a shelf life. Many times I see capacitor problems that will not allow the compressor or the fan to come on. Many times you can clearly see that the capacitor is bad because it is swollen or even blown apart with capacitor oil everywhere! Sometimes you need a special meter to test the microfarad (MFD) rating. Most of the time you can tell the capacitor is bad because it is swollen up. Please see the picture below for the comparison between a good and bad dual run capacitor. We call them, "Dual" because the capacitor helps run both the fan and the compressor. 


                                Bad round dual capacitor on the left.      Bad oval capacitor on the left. Good oval

                                 Good round capacitor on the right.        capacitor on the right.

Solution: You need to purchase a new capacitor. We have many different types of capacitors listed on our Run Capacitors Page

We would love to have your business!

There are so many different types and sizes of capacitors that I have them listed on another page. We will be adding more capacitors as time goes on. Here is a link to our Capacitor Page with an opportunity to purchase Capacitors:


Contactor Problems:

Problem #4: Air Conditioning outdoor condensing unit or heat pump unit will not shut off. It continues to run no matter what you do.  The only way you can get the outdoor unit to shut off is turn off the breaker or pull the outdoor disconnect. Also, sometimes when the contactor fails the outdoor condensing unit will not come on at all. Dirt or insects (I see ants many times) can get in between the contact points while the contactor is off, and cause the air conditioner not to come on at all.  When the contactor is stuck in the "On" position (contacts welded together), Ice will form on the indoor evaporator coil and all the way out to the outdoor unit. I have seen 1 or 2 inches of ice form on the line set and outdoor unit compressor. You will not get hardly any air flow through your duct work when this happens because the evaporator has become a complete block of ice.  If this is your problem then your contactor points could be stuck, welded together causing the outdoor unit to run continuously. Many times when ants or insects get between the contactor points the outdoor unit will run (burns the insect out), but because of the uneven wear (arcing) in the contact points the contactor will soon fail. Arcing causes a tremendous heat build up and pitting of the contact points. If you are in an area of the country where insects are prominent in and around air conditions, then I would suggest you blow your contactor out with compressed air or check and make sure you do not have any insects in between the contactor points at the beginning of each cooling season. You might want to keep a spare contactor on hand?

If your contactor looks like the single pole contactor below, with burnt or pitted contacts then you need a new contactor. The picture below is a single pole contactor out of a Rheem air conditioner.

Solution: You need to solve this problem by purchasing a new contactor. We sell them on the following page: Please click here to go to our contactors page.

Contactor's Purpose: The contactor has a 24 volt relay, when this 24 volt relay is energized from the thermostat, a call for cooling, the contacts on the contactor close, making a high voltage (220-240) connection to your compressor and outdoor fan, causing the outdoor unit to come on. There are several types of contactors that we sell. They are sold on the following page:

 *Please make sure your electrical power is off before attempting to remove or work on air conditioning equipment. Pull the outdoor disconnect or indoor breaker that controls the air conditioner. Turn the furnace off or thermostat off so no low voltage is going through the low voltage wiring.   


Term-Lok Compressor Terminal Repair Kit Model TLC-3-10: 

Problem #5: Compressor will not run. First, you turn off the power to the air conditioning system. Second you remove the compressor terminal cover and find that one or two of the compressor terminals have burned completely off. Yes! that is why the compressor is not running!

Solution: Remove the old burnt terminal/terminals, and use the "Term-Lok" compressor terminal repair kit to replace the burnt terminals and wires. 

The "Term-Lok" compressor terminal repair kit is one of my favorite items to have on the truck during the summer time. The "Term-Lok" compressor terminal repair kit has saved many of my customers from having to purchase new compressors or air conditioning systems. I see many, many burnt compressor terminals during the course of the summer. Many contractors will tell their customers, "You need a new compressor or new air conditioning unit." Most of the time this is not true! All you need to do is use the "Term-Lok" kit to repair the compressor terminals and you are back in business for a long, long time.  Before I found out about the "Term Lok" compressor terminal repair kit I would try to solder the terminals on using a soldering gun. I found out the hard way that the solder would not hold but for a short period of time. Before long, I would get a call again, "My air conditioner is not working."  I would go look at the compressor terminals, and there again, one of the terminals or terminal was burnt completely off again. I could not believe it!  Since I have started using the "Term-Lok" repair kit, I have not had one call back for burnt compressor terminals! This new Term-Lok compressor terminal repair kit is not cheap, but it is much better than having to get a new compressor or air conditioning system. This compressor terminal kit costs $40.00. I figure the kit is so expensive because of the brass terminal connectors and the way they have permanently connected the #10 gauge wires. What I really like about this kit is that it lasts! No more burnt compressor terminals! The kit is called "Term-Lok" because it actually locks the wires to each compressor terminal. You use a small Allen key wrench to tighten or lock the solid brass terminals to the compressor terminal stubs. There is an Allen screw that can be placed in either the bottom or top of the brass terminal. This makes the installation easy. If there is 1/4 inch left on the compressor terminal studs, then you can use the terminal lock kit to fix your compressor. Be prepared for the hot summer and have a  compressor "Term-Lok" terminal repair kit on hand. Please click on the "Add to Cart" button below to purchase using a secure VeriSign or PayPal server. Thank You!


Above is a Close-up of the three brass terminals with Allen wrench and screws.


Above is a picture of the entire kit. The wires are 36" long #10 Gauge wire

Term-Lok Compressor Terminal Repair Kit Model TLC-3-10 


Above are some pictures taken of the label:

Below is a picture of the Installation Instructions. Please click on the thumbnail below if you would like to read the instructions. Please click on your browser's "<" back button when finished reading to return to this page. We would love to have your business!


Term-Lok Compressor Terminal Repair Kit Model TLC-3-10 

Price $40.00 Each


International Refrigeration Products Low Voltage Universal Transformer #TFM4031:

Problem #6: Nothing works on your heating & air conditioning system. The fan will not blow in the fan "ON" position. The gas burners will not light, the outdoor air conditioning unit will not come on.

Solution: Use a Volt Ohm meter, set the meter to "Volts AC," to check and see if you are getting between 24-28 volts between your "C" and "R" terminals on your low voltage board, or between "R" the red low voltage thermostat wire and ground. You might have to tape the blower door safety switch, to keep the voltage on so you can perform this test. Turn your power back OFF after completing this test using the Volt meter. Check for fuses on the furnace control board to see if the furnace has a low voltage protection fuse. If the furnace has a fuse pull the fuse out and see if it is blown. If the fuse is blown check all your low voltage wiring to make sure it is not grounding out anywhere. I have seen pinched wires that are stuck between furnace doors, animals that have chewed through wires and just weathered low voltage wiring that has lost its insulation due to the hot sun over the years. Any wires that are touching together can cause the low voltage fuse to blow. The fuse protects the expensive furnace control board from getting burned up because of a short to ground. If the fuse is blown then I would go to the local hardware and purchase 5 to 6 new fuses. If you do not find the problem that is causing the fuse to blow right away then you will need more than one fuse for testing. If your fuse is OK or your furnace does not have a fuse, and you are not getting low voltage between the "C" and "R" terminals then you might need a low voltage transformer. I have seen some of the transformers just go bad. Below I explain the job of a transformer. We have pictures of the JARD Magnetics transformer with an opportunity for you to purchase.

What is a Low Voltage Transformer? The job of a low voltage transformer is to take 110 volts AC on the primary end, and transform or lower the voltage to 24 volts on the secondary end. That is why on the transformer label, below it has "PRI" 120, 208, 240 and SEC 24V 40VA. The transformer that we sell can be used with multiple voltages either 120 volts, 208 volts or 240 volts. You would hook up the right color coded wire to use the voltage that you have. The color coded voltage wiring directions are on top of the transformer. For example: The white and black wires would be used for 120 volts for most furnaces. The White and Orange wire would be hooked up if you were using the transformer to replace a bad transformer on an outdoor air conditioner or heat pump that uses 240 volts. The Blue & Yellow wire are the secondary 24 volts AC.

Above close-up of label on top of transformer:

International Refrigeration Products Low Voltage Universal Transformer Model TFM4031  

Price $15.00 Each


Prevent Your Air Conditioner or Heat Pump from Cycling Off and On too much with a 

Delay On Make Timer.  Beacon Model TDOM

This Beacon Delay on make timer replaces the following timers: ICM102B, EAC700, EAC701, TD69, 3310-06, 3239, 32367, IC-310, IC-213, & AC-800.


Problem #7- You might consider purchasing and installing the following device if:

1. You have to reset your air conditioning circuit breaker often. 

2. If you have electrical storms where the power is going off and on. I

    have many calls after electrical storms. Please always turn your air

    conditioner off during a storm. 

3. If the power goes off and on often in your home. If the power goes off

    and on often in your home then this can ruin a compressor. When your

    air conditioner is turned off you should wait at least 3 to 5 minutes

    before you turn it back on. If you do not wait the 3 to 5 minutes then

    this causes a tremendous strain on the compressor motor because the

    motor is trying to start without the pressures being equalized. Please

    give your compressor and air conditioning system time for the pressures

    to equalize before starting your air conditioner again. 

4. If you have children living in your home, renters, or other people who

    do not understand that you should wait 3 to 5 minutes before cycling

    and air conditioner off and on.

Solution: Purchase a delay on make timer pictured below. You can set this timer to the length of time you want to wait for the air conditioner to come back on from .03 of a second to 10 minutes. What this timer does is delay the amount of time you want your air conditioner to come on when low voltage power is applied to the timer. This low voltage timer is simple to install. *Some of the new thermostats have this delay feature built into them. If you have a thermostat that has this delay feature, then you do not need to purchase the Delay On Make Timer pictured below. If you want to protect your air conditioning system from short cycling and possible compressor damage, then the Delay on Make timer is for you!  Please remember to turn off all power when working on air conditioning equipment. 

Below are pictures of the timer with an opportunity for you to purchase:


Below we have thumbnail pictures with installation instructions, wiring diagram, mode of operation & specifications. Please click on your browser's "<" button to return to our site. We would love to have your business!


Delay On Make Timer Beacon Model TDOM

Price $15.00 Each


Prevent Refrigerant Leaks With A

Box of 10 Model #JB NFT5-4 Quick Seal Schrader Valve Caps:


Problem #8- Air conditioner is freezing up. You see frost or ice on the suction line (black insulated line) Any areas that are not insulated are covered with ice. You are not getting hardly any air flow out of your registers. Your evaporator coil is iced up completely. Most of the time this is caused by being low on refrigerant charge. There are other causes such as: 

1. Dirty air filter or some air flow restriction. 

2. Dirty blower 

3. Slow or dragging blower motor (might need a new capacitor). 

4. Dirty stopped up Evaporator coil (Need to have HVAC tech clean coil) 

5. Long Air conditioning run times. Setting thermostat below 72 degrees

    with cool outside conditions. 

6. A stuck contactor that keeps the outdoor unit running even when the

    indoor blower is not running or when the thermostat is calling for

    cooling. We sell contactors above.

Most of the time a freeze up condition is caused by a low refrigerant charge. Since the air conditioning system is supposed to be a leak free, sealed system this means you have a leak somewhere. I use the Schrader valve caps sold below to make sure that I do not have a leak in the Schrader valves when I take my manifold gauges off.  I install these Schrader caps for insurance, because I have seen leaks in these valves many times. These caps have a rubber seal inside of them and insure a leak proof seal.

 Below are some pictures with an opportunity for you to purchase:


 Above, Schrader Caps Installed      

       on an outdoor AC unit.           


Above Schrader caps in box ready

to ship. They come in a box of 10.

Box of 10 Model #JB NFT5-4 Quick Seal Schrader Valve Caps  

Price $8.00


More on refrigeration leak detection:

I have other leak detection tools such as an alarm type electronic leak detector, $215.00 and a UV black light leak detection system $550.00. I think that finding refrigerant leaks is the hardest job any HVAC technician has to do. With the new EPA rules and regulations it is a must to find the leak and stop it, or I can face a huge fine. First, you visually look for refrigeration oil spots. This is a sure sign of a bad leak. If I can not visually see the leak I use my electronic leak detector, and if that doesn't work I inject a bottle of florescent leak detection solution into the system let it circulate and try to search for the leak with a black light. The leak with show up bright yellow when the UV light hits it. The UV black light leak detection system needs to be done in low light conditions. Sometimes I ask the customer to come back after dark to find the leak or I crawl under a tarp to block the sun light out. This is really fun when it is 90 plus degrees out! Wow! You talk about hot!  It is really cool and rewarding when you see that bright yellow leak shining back at you! You can show the customer exactly where the leak is too, but sometimes you have hidden areas that even the light can not detect. About 90% of the time it is the indoor evaporator coil leaking. It must be poor coil construction, added to the expansion and contraction of the metal during the heating and cooling seasons that cause these coils to leak. I replace on the average about 20 evaporator coils a summer! Some of these coil are only two to three years old. I can't believe it! It is just poor construction. I would like to recommend that you get a warranty of at least 5 years on your air conditioning system that would include the indoor evaporator coil. Many times the coils are only warranted for one year. Thanks for reading my frustrations with finding refrigerant leaks. I hope that you do not end up with one of those leaking, out of warranty evaporator coils that I see every summer! God bless you and your family. 


What to Check  for If Your Air Conditioning System is not Working

1. Check the circuit breaker to make sure the breaker has not tripped. The breaker would probably be a double pole 30, 40 or 50 amp breaker.  Even though the breaker looks like it is on I would still flip it all the way to off and back on again just to make sure. Sometimes one leg of a double pole breaker will hold in the other leg and make the breaker appear to look like it is, "ON" when it has actually been tripped.

2. Make sure your thermostat is turned down to a temperature that will allow the air conditioning system to come on. Sorry! I hope I did not insult your intelligence! I want to try to cover everything! I have been on several service calls when not having the thermostat turned down far enough was the only problem. If your thermostat has the little levers on it then it would not hurt to flip the little lever from "OFF" to "COOL". On several service calls I have seen all that it takes is a flip of this little lever on the thermostat. Sometimes the contacts in the thermostat do not make the connection and flipping the levers will reestablish the connection. I would turn your fan to the "ON" position. Did the fan come on? If the fan did not come on check the switch on the side of your furnace to make sure it has not been turned to "OFF". Make sure your filter access door and furnace door are secure. Many of the furnaces have a switch activated door for your safety. When the door is not completely on the furnace will not operation. This keeps the furnace from coming on when someone is servicing the blower or filter. 

3. If your outdoor unit is running listen to determine if the fan is the only thing running or is the compressor running too? 

4. Turn off your electrical power to the outdoor unit by pulling the disconnect switch or turn off the indoor circuit breaker. Take the screws off your air conditioner control access panel. Check with a multi-meter to make sure the power is actually off. Touch the top of the compressor. Is the compressor very hot? If the compressor is hot then the compressor could be out on thermal over-load. You need to wait and let the compressor cool down before you test your system again. Sometimes I use water from a hose and gently let it run over the compressor to cool it down quickly. Sometimes it can take 2 or 3 hours for a compressor to cool down. After it has cooled down reapply power. Did the compressor start? Did the fan start? If the fan did not start with the compressor then this is why the compressor over heated. Check your fan motor and fan run capacitor to make sure the fan blade is free and the capacitor is in good shape. You can check the fan bearings by spinning the blade by hand the blade should continue to spin 3 to 5 seconds after you spin it. If it doesn't then you probably need a new fan motor. We do not sell fan motors. Another reason the compressor over heated could be that the system is low on refrigerant. Is the suction line (the line with the black insullation) cold like a cold coke can right out of the refrigerator after the unit runs for 10 to 15 minutes. If it is not cold, then you need to add some refrigerant. The refrigerant is what keeps the compressor running cool. If the system is low on refrigerant then you do not get the cool gas coming back to keep the compressor running cool. The compressor over heats, and this will eventually melt the windings down in the compressor and contaminant the whole refrigeration system! This is not good. Eventually the compressor will ground out and you will need a new compressor or new system. Please make sure that suction line is cold or you might be low on refrigerant charge. You will need to call a service technician to charge up your system if it is low. Now EPA require that you be licensed and certified to purchase and use refrigerants. 

5. Inspect your wiring to make sure that you do not have any burnt connections. Repair the burnt connections if you have some. 

6. Inspect the capacitor/capacitors to see if they are swollen looking. If they are swollen purchase a new capacitor from our capacitor page. Click here for Our Run Capacitors Page.

7. Take the compressor terminal cover off and inspect the terminals on the compressor. Sometimes the compressor terminal cover can be a bear to take off. I use a screw driver to release the metal clip that holds the cover on. Sometimes the cover slides off. Sometimes the terminals unplug from the compressor. If any of the compressor terminals are burnt then you could probably use our Term-Lok compressor terminal repair kit to repair the terminals. Please see Term-Lok compressor terminal repair kit above on this page.

8. Inspect your contactor. Is your contactors points look burnt? You might need to purchase a contactor that we have listed above on this page.

9. When you plug in the disconnect and apply power to your outdoor unit does the fan start and the compressor try to start, but make a "UGGGG" sound. This means the compressor is locked up. The compressor is an electric motor, enclosed in a case, with a piston similar to what you would find in a car. When you hear that "UGGG"  sound it is telling you that the piston is locked up. We need to try to unlock the piston. If we can not unlock the piston then you need a new compressor or air conditioning system.  You might want to purchase a Super-Boost hard start capacitor. I have used this device to save many a compressor. The Super-Boost is also listed above on this page.  If you purchase and hook-up the hard start capacitor and the compressor still will not start then I am afraid you will need a new compressor or system. I say, "System" instead of just outdoor unit because it is recommended that you change both the outdoor unit and the indoor evaporator coil when you install a new system. Manufacturer's say that it will damage the outdoor unit if you do not change the evaporator coil too. 

Best of luck! I hope this has helped you to trouble-shoot and repair your air conditioner! I hope you can get your air conditioner up and running again soon! I admire you for trying to repair your air conditioner yourself. Please be careful and make sure the power is turned off and you do not get cut on those sharp sheet-metal edges. Just take your time and think things out step-by-step. God bless you and your family.

Sincerely, Steve Arnold, President, 

Arnold's Service Company, Inc.


Please Remember Safety First


Please read our disclaimer and safety related information below before attempting to do any type


 of Heating or Air Conditioning Repair. We do not want to see anyone get hurt or shocked!


 Thank You!

*Please always turn off all electrical power, and discharge the capacitor/capacitors (if working around capacitors) before attempting to inspect or repair any heating & air conditioning equipment. Check to make sure the electrical power is off with a reliable meter. I have never been shocked by a capacitor (knock on wood) and rarely see them discharge, but it is a good idea to discharge them before working around them. Please read below. It tells you how to discharge a capacitor.

Please read the following: 

How To Discharge The High Voltage Capacitor: The capacitor is discharged by creating a short circuit (direct connection) between the two capacitor terminals and from each terminal to chassis ground (bare metal surface). Please make sure that you are touching the insulated screw driver handle and not the metal part of the screw driver before attempting this procedure.

  1. Do this by touching the blade of an insulated-handled screw driver to one terminal, then slide it toward the other terminal until it makes contact and hold it there for a few seconds. (Sometimes this can result in a rather "pop!")

  2. Repeat the procedure to create a short between each capacitor terminal and chassis ground.

  3. If the capacitor has three terminals, use the same procedure to create a short circuit between each terminal and then from each terminal to ground.

Disclaimer: We assumes no liability for any incidental, consequential or other liability from the use of this information. All risks and damages, incidental or otherwise, arising from the use or misuse of the information contained herein are entirely the responsibility of the user. Although careful precaution has been taken in the preparation of this website information, we assume no responsibility for omissions or errors.

How Air Conditioners Work & When They Don't Work

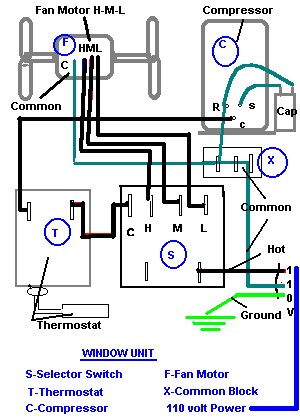
AIR CONDITIONING HELP**THIS IS FOR THE DO IT YOURSELFER WHEN THINGS HEAT UP

To post a message or a question visit my message board

Are you sweating and want to fix or at least learn about air conditioning, either home or car then you are at the right place.

If your looking for AUTO air conditioning help go here.

A/C trouble shooting tips

How to read and understand A/C gauges

If you know that the problem is electrial ie. fan motor not running or everything isnt running then go here to my a/c electric page.


The main thing to remember is that all freon(refrigerants) work the same way no matter what is cooled, as in ice machines,de-humidifiers,freezers,coolers for flowers,ect.

They all have a compressor, evaporator(cold coil), condensor(hot coil), expansion valve, and some way to remove the heat such as fans,water,buried underground,ect.

They may use different refrigerants such as R-11,R-12,R-502,R-111,even ammonia

Ammonia is somewhat different and dangerous so do not attempt to service these !!!!!

"Freon" is also dangerous and you should take great care not to get any liquid freon on you as it will freeze your skin on contact, The vapors are not as dangerous though make sure your in a well ventalated area because it displaces the air in the room, meaning it collects in clouds you cannot see.

Also when freon is burned (passes through a flame) it becomes toxic, when you smell something like an ammonia & bleach type smell its been burned and do not breath it.

"Freon is also under pressure some systems it can be as high as 300 or more psi.


HERE ARE SOME QUICK TIPS WHEN TROUBLE SHOOTING

Central Air Conditioning

First of all check the power to each unit (condenser*outside unit) Air handler (inside unit) for power, check the breakers or fuses on the inside of the house and there should be a breaker on or near the outside unit.

Check and make sure that the fans (both) outside and inside are running

If you have a package unit. The type that are on house trailers. The unit is all contained in one box with the duct work (2 duct hookups, in and out)the blower for the inside air is inside the box so just feel if any air is blowing out the ducts and the outside fan is running....P.S.-- if the cold coil is frozen than you won't feel any air blowing from the vents but the motor will still be running--. If you want to check to see if your inside air motor is running than turn your thermostat off, then click the fan switch to ON from the auto setting if its wired correctly you will hear the fan running inside the box..

The compresser must be running, it can be hard to hear if its running but they do have a buzzy type sound.

Look for any ice on any of copper tubing, if you see ice then your a/c is frozen up (cold coil).

One thing that is important is that the air coming out of the outside unit should be very warm unless you have a high efficient unit.

w If you have a split system (unit outside & a air handler inside) then while your central air is running feel the temperature of the bigger of the two copper tubes that come out of the unit. The bigger tube should be cold like a cold soda can, and the little tube should be warmish.


Pressures on gauges...

The readings on gauges are in pressure psi. If you look at the inside of the gauge there is a pressure temprature chart printed on the gauges for r-12, r-22, r-502. High and low side. Newer gauges have different charts.

Lets look at a few examples.

R-12 on the gauge.

If the pressure on an r-12 system on the low side, while the unit is running is 35 psi.(the outer black colored chart) then look at the smaller circles for the R-12 circle. The needle pointing to 35 psi. also crosses the R-12 circle, look at the corresponding number on it to determine what temperature the coil is operating at. It will be about 38 degrees F'.

If your hi side on r-12 is at 160 psi. then look on the inner part of the gauge on the high side it will read about 120 degrees f.

Lets look at r-22 on the gauge.

If you have a low side of 68 psi. reading on your gauge then look at the inner chart for r-22 at 68 psi. it is about 38 degrees f.

If you have a high side reading at 220 psi. then on your chart the gauge will read about 110 degrees f.

The evaporator (cold coil) on any air conditioning system should never be below 32 degrees f. Why because the condensate (water) on the coil will freeze, freezing up the system.

Freezers and refrigerators keep the temperature of the evaporator (cold coil) below freezing to keep the freezer cold enough to freeze. The coil operates at about 0 degrees f. So with the coil being that cold the condensate will turn to ice which will clog up the coil with ice. This will shut down the cooling. Refrigeraters have a defrost timer that turns on the heaters and shuts off the compressor. The timer keeps the defrost on for about 30-40 minutes. The thawing ice will drain down to the water pan under the frig to evaporate.

If your system runs low on refrigerant it will freeze up because the lack of pressure means the evaporator (cold coil) will be under the 32 degree mark, thus freezing the water.

It seems weird that if you loose refrigerant you would think that the system would warm up but thats not how it works. Think about it. 


AUTO AIR CONDITIONING HELP

NEW Check out one of the latest R-12 freon replacements "ENVIRO-SAFE".

NEW Check out another of the latest R-12 freon replacements "Hot-Shot 414b".

This page is for non a/c experts who are hot and sweaty.


This Image Of a Typical Auto Air Conditioner Is a Good Reference guide


This is another view of a typical A/C system.


Change from R-12 to R-134 click here...

If you own a van with dual units both front and rear then do not use R-134 as a replacement refrigerant it will not work well, if at all....

This page is also for persons that enjoyed being able to recharge their vehicles by themselves back when we were able to get refrigerant R-12 at the local auto store.

Well now you can buy the little cans of refrigerant over the counter again, but it is R-134. Its better than nothing.

If you have the time read Jbabs air conditioning help page to understand what the freon does in an a/c system. Air conditioning works the same no matter what the applicatiion. auto, home, commercial, freezer, refrigerator,, ect..

If you want to change from R-12 to R-134 then page down this page for info.


Looking For The R-134 Refrigerant 134a Temperature-Pressure Table


Temperature (F)

 134a (Psig)


 -60.0

21.6*

-55.0

20.1*

-50.0

18.5*

-45.0

 16.7*

-40.0

14.6*

-35.0

12.3*

-30.0

9.7*

-25.0

6.7*

-20.0

3.5*

-15.0

0.1

-10.0

2.0

-5.0

4.2

0

6.5

5.0

9.2

10.0

12.0

15.0

15.1

20.0

18.5

25.0

22.2

30.0

26.1

35.0

30.4

40.0

35.1

45.0

40.1

50.0

45.5

55.0

51.2

60.0

57.4

65.0

64.1

70.0

71.1

75.0

78.7

80.0

86.7

85.0

95.3

90.0

104.3

95.0

114.0

100.0

124.2

105.0

135.0

110.0

146.4

115.0

158.4

120.0

171.2

125.0

184.6

130.0

198.7

135.0

213.6

 140.0

229.2

145.0

245.5

150.0

262.9

155.0

281.1

160.0

300.0

* - (in Hg) Vacuum


The so called oil change and O-ring change required...

I have seen and done a lot of vehicles without the oil and o-ring change, just the refrigerant was changed and wah-lah none of them has failed even after 4 years. Many people get worried about this because of what they have heard or read. I along with friends also in the ac trade say they have not had any failures do to the oil breakdown.

If your system had needed charging a half times a year or so do to a leak than add "2 ounces" of R-134a oil in a pre charged can to replace any lost oil do to leaking.

Most of you will not have the massive load of tools for a/c work but have no fear you and I should be able to figure out how to get that a/c cooling even if all you have for tools is a screwdriver, pliers, and a butter knife.

Auto air conditioners that are barely working or working but not quite as well as before are simple a/c's to fix, usually they need freon added.

Sometimes when the a/c isn't running well and adding freon doesn't help then it can be hard to figure out.

The most common problem is that the refrigerant (Freon) leaks.

When the system does leak, the first thing that happens is the a/c does not work well when you need it the most (hot!! summer day). At night it will work better. What causes this is a pressure sensor that turns off the compressor if the pressure drops below the pre-set setting of this switch.

The low side of a working car a/c should be around 40psi. when the outside temperature is hot (summer).

As the system looses more and more freon the low side pressure will drop more and more. The switch will cut off the power to the compressor when the pressure drops to about 25-30psi.

When the compressor stops the high pressure side will bring the pressure up as the system equalizes. The switch will sense the pressure rise in which the compressor will come on again. Then it starts over again.

The less freon there is the more the switch will turn the compressor off/on/off/on ect.. After a certain point the a/c will not work at all.

This low pressure switch is there to 1: Regulate the compressor. As the temperature of the air in the car gets cooled the pressure on the low side drops, if you run the a/c with the fan on low the cold coil can get so cold the water condensat will freeze up the coil. 2: The switch will keep the compressor from running if the system gets low of refrigerant.

Some vehicles use a switch on the high pressure side, it does basically the same thing. Except it senses the high pressure and will shut down the compressor when the pressure goes to high or to low. For Saftey.

If you take the time to read through what I have posted on this site you should gain enough information to help you figure out why your a/c is not working, if you have any mechanical ability it should not be to hard to pinpoint the problem. If you are petrified of the thought of air conditioning trouble shooting then go to my vehicle air conditioning check list . This will only help to figure out what may be wrong but you will still pay dearly to have someone else do the repair.


Topping Off The R-12 System.

The topping off of an R-12 system that needs a small amount of R-12 freon is the same as fillng the system up with R-134. When you connect the R-12 can or jug to the fill hose or gauges you then must connect the hose to the low side of the ac. After doing so add the freon slowly until the aluminum tubing that connects to the compressor starts to sweat (drip water). Feel the tubing at the compressor by hand it should feel very cold, like an ice cold soda out of the refrigerator. When the low side tube is cold and sweating your done charging/topping off the system. Be sure not to put in so much freon that the compressor starts to sweat. Only the tubing that connects to the compressor should sweat. (be sure not to touch the high side tubing coming out of the compressor as it can burn you). If you have gauges then the low side reading on a warm day should be around 40 psi.


Leak Detecting


If you find you do have the most common problem a leak, look for an oil stain on the tubing, there will be a dirty oil stain where the leak is, this is because there is oil flowing around with the freon. If your looking for a leak check all the hose connections, and the connections to the coil up front and the compressor, look for the oil stain as described above.

Chances are your vehicle uses R-12 refrigerant, you can check by looking at the stickers under the hood. If thats the case, and your vehicle has a slow leak I recommend going to an auto store and pick up the kit to change your freon from R-12 to R-134, R-134 is now available over the counter. You must get the kit because the R-134 cans have a special adapter valve you must install on top of the original access valves (the fittings where you connect the hoses for service) on your system.

YOU DO NOT- use the same amount of R-134 as you do R-12 as the refrigerants have different molecule sizes. Use 80% of the R-12 charge.

R-12 is no longer being produced because of the so called ozone depletion. It is still available but expensive about $20 to $30 a pound. R-134 is less per lb. Now the R-134 is not quite as effecient as R-12 but it works quite well. There are many other gases on the market now. These 2 that I list work much better than the R-134a from what I have experienced. These are "Hot Shot R-414b" Also the refrigerant "Enviro-Safe R-ES-12a"


Changing from refrigerant R-12 to R-134a

If you would like to change the gas from R-12 to R-134 something you can do yourself now that you can buy the little cans again, Read below for help.

Working on pressurized refrigerant systems is dangerous so do it at your own risk.


HOW TO CHANGE THE FREON FROM R-12 TO R-134


To change to R-134 you will need.
1-- Kit with fittings
2-- 2-3 cans (12 oz.) of R-134
3-- 1 hose kit with the adapter to fit on the R-134 cans, and also connects to the vehicles ac system (low side).
4-- A big bowl of hot tap water.

Before being able to charge the vehicle the R-12 needs to be removed. In the old days you could just depress the valve to let what is left of the R-12 out. It is like letting the air out of a tire. But that is against the law. Your supposed to have the R-12 vacuumed out (recovered).

Install the new R-134 fitting on the "low side". The R-134a kits come with 2 134 adapter valves. A question that is often asked is "Which adapter do I put on the low side"? or "How do I make sure which one is the low side"?

The 134a fittings will only fit on the exact old fittings. They are different sizes. You cannot get them wrong. The old R-12 low side fitting is a 1/4 inch flare fitting. The high side is a 3/16 inch flare fitting. So the new R-134a fittings only fit one way. The larger of the two is the low side.

The R-134a cans fill hose will only fit one of the fittings, that is the low side. You cannot get this wrong.

If your vehicle is equipped with a shiny can "accumulator & dryer bag" then the valve on the can is the low side. See image below.


Below are a few common places where the low side fittings can be found.


WARNING: Your vehicles a/c system will not need every bit of 3 cans. The reason I put 2 to 3 cans of R-134 is that most vehicle a/c's actually fall between needing 1_1/2 to 3 cans.

Read the instructions on how to connect the new fitting on the low pressure side. This new fitting will now allow the R-134 hose to connect to the vehicles a/c.

Now read the instructions on how to connect the hose to the freon can.(The kit will have a connector that fits on the top of the freon can)

You should now have a full R-134 can connected to the hose.

Next, tighten the "T" tap valve by turning it clockwise. Keep turning the T valve until it stops tightening. This pokes the hole in the can to let the freon out. Now open the valve slowly untill you hear gas coming out of the hose on the can. The reason I want you to do this is to push (purge) the air out of the yellow filling tube on the can to keep you from putting air in the system.

At this point you are ready to gas up.

If you bought a R-134 retrofit kit then you may be confused by the directions on the kit. If I remember correctly it states to put in the first 2 cans upside down. I dont like beginners shooting liquid freon into systems. If you want you can shoot in the first can upside down, *be safe*.

After purging the air out of the hose connect the hose to the new fitting on the low side.***see image below***

Start the engine then set the a/c on hi cool and hi fan!. Keep the passenger door or windows open!.


Watch the water temp gauge on the engine you dont want to overheat the engine while doing this.

Now with the engine running and the a/c set on hi-cool/hi-fan turn this first can upside down. Open the valve on the can and let the liquid freon in slowly (dont be in a hurry!). After some of the freon gets into the system the compressor will kick on and off. This is normal. Keep slowly adding the freon until the can gets empty.

Now that the can is empty disconnect the fill hose from the a/c. Then unscrew the 1 st can of freon (there will be pressure left in the can so dont be alarmed). Now screw the second can onto the "Tap". Then turn the tap clockwise until it stops again. Now the second can is ready to be connected. Put the hose on the low side fitting. But this time do not turn the can upside down. Open the "T" valve slowly to let the freon in again. With the freon can being up the outside of it may freeze. So as the gas is leaving the freon can you can shake the can while it is filling. When the can gets real cold this is where you dip the can into the hot tap water. Doing this will keep the pressure up in the freon can while its filling.

Getting the refrigerant (Freon) charge is the most important and hardest thing for you to get correct. The best way to tell is by hand. Find out which aluminum tube that is connected to the compressor is the low side. The low side aluminum tubing that enters the compressor is what you feel. "BE CAREFUL NOT TO GRAB THE HIGH SIDE ALUMINUM TUBE THAT EXITS THE COMPRESSOR AS IT CAN BURN YOU" Keep adding freon while you feel the tubing. You will keep adding freon until the aluminum tubing gets cold and sweats.

The a/c will be correctly filled when the aluminum tubing that connects to the compressor will be cold and sweating. Like an ice cold soda can. The compressor itself should NOT sweat!! If you overcharge the system the compressor will sweat and by now you should know that just the low side tubing entering the compressor should be sweating. Now you can only feel the aluminum part of the tubing not the black rubber.

AGAIN CAUTION: Be careful not to touch the other tube coming out of the compressor that goes toward the radiator it will BURN you.

If you have gauges the low side at idle on a hot day will be about 40-50psi.

That is all there is to it..

I will go over it again quickly... Start with no pressure in the auto's a/c, then put on the new valve in the kit over the old valve (low side) on the shiny can if your car has one. Then start the engine and put the a/c on hi cool with the fan on hi, open the doors or windows then connect the first R-134 can to the fill hose, turn the "Tap" valve clockwise until the can is punctured. Then open the valve to let some freon out of the can, this will push (purge) the air in the hose out. On the first can turn it upside down. Connect the hose to the new low pressure side valve (these are pop off type valves like an air compressor uses). Turn the first can upside down. Let the liquid in by opening the "T" valve slowly. This will allow liquid freon in slowly. After letting in the freon the compressor will come on and off, this is normal. As you add more and more freon the compressor will stay running. keep adding gas until you have a very cold and sweaty low side aluminum tube that connects to the compressor. DO NOT OVERFILL, overfilling will make the compressor sweat, also the pressures can go dangerously high.


Click Here To Return To Link Page